Showing posts with label Asp.Net - Development. Show all posts

Thursday, June 7, 2012

Disable Button While Processing a Request in Asp.Net

I have been looking into a problem of disabling a button when user clicked to prevent the multiple clicks. Finally I got a solution.

I tried to disable the button in client side by writing a piece of javascript code, but it doesnt work. If we want this in client side, we need to do all the validations and all other client side stuffs manually.

This is a tricky logic, if you have eny better idea please share.
Add the following html code.

<asp:Button ID="btnSearch" CssClass="button" runat="server" Text="Search" 

onclick="btnSearch_Click" />

<div style="display:none">

<asp:Button ID="btnSearch1" CssClass="button" runat="server" Text="Search" 

onclick="btnSearch1_Click" />

</div>


Add the following javascript in your aspx page
<script type= "text/javascript">

function postSearchData() {

jQuery(document).ready(function () {

jQuery("#btnSearch1").trigger("click");

});

}

</script>


Add the Buttons event handlers
protected void btnSearch_Click(object sender, EventArgs e)

{

btnSearch.Enabled = false;

Page.ClientScript.RegisterClientScriptBlock(typeof(Label), "postback", "postSearchData();", true); 

}

protected void btnSearch1_Click(object sender, EventArgs e)

{

System.Threading.Thread.Sleep(5000);// remove this line
// do your operations here.
btnSearch.Enabled = true;

}


In the above example btnSearch is associateed with all validation controls and it does the validations. When user clicks on it it cause a postback and disable it, a piece of javascript code is written to the page after the postback to automatically fire the btnSearch1 button's click event. btnSearch1 will remain always hidden.

Hope this will help you, do not hesitate to share your comments.

Monday, June 20, 2011

Styling Asp.Net Menu control with CSS - Example

Hello friends, here is an example to styling asp.net menu control by using a simple css and a background image. Hope it will help you

To create this stylish menu follow the following steps.

1. Create Menu.css file and type the following css code.

.Menu
{

}

.Menu ul
{
background:#7795BD;
}

.Menu ul li
{
background:#7795BD url(menu_bg.gif) repeat-x;
text-align:center;
/* set width if needed.*/
width:200px;
}

.Menu ul li a
{
color: black;
padding: 4px 2px 4px;
padding-left:8px !important;
border:1px solid #648ABD;
border-bottom: 0;
}

.Menu ul li a:hover
{
background-image: none;
}

.Menu ul li a:hover
{
color: White;
}

.Menu ul li a
{
color: Black;
}


2. add the following image into the web application.


3. place menu control and set the CssClass property as given below

<asp:Menu ID="Menu1" runat="server" Orientation="Horizontal" CssClass="Menu">

<Items>
<asp:MenuItem NavigateUrl="#" Text="New Item" Value="New Item">
<asp:MenuItem NavigateUrl="#" Text="New Item" Value="New Item"></asp:MenuItem>
<asp:MenuItem NavigateUrl="#" Text="New Item New Item" Value="New Item"></asp:MenuItem>
<asp:MenuItem NavigateUrl="#" Text="New Item" Value="New Item"></asp:MenuItem>
</asp:MenuItem>
<asp:MenuItem NavigateUrl="#" Text="New Item New Item" Value="New Item">
<asp:MenuItem NavigateUrl="#" Text="New Item" Value="New Item"></asp:MenuItem>
<asp:MenuItem NavigateUrl="#" Text="New Item" Value="New Item">
<asp:MenuItem NavigateUrl="#" Text="New Item" Value="New Item"></asp:MenuItem>
</asp:MenuItem>
</asp:MenuItem>
<asp:MenuItem NavigateUrl="#" Text="New Item" Value="New Item">
<asp:MenuItem NavigateUrl="#" Text="New Item" Value="New Item"></asp:MenuItem>
</asp:MenuItem>
<asp:MenuItem NavigateUrl="#" Text="New Item" Value="New Item">
<asp:MenuItem NavigateUrl="#" Text="New Item" Value="New Item"></asp:MenuItem>
</asp:MenuItem>
</Items>

</asp:Menu>

Tuesday, June 7, 2011

Advanced TextBox for Asp.Net ( TextBox with built in Validation )

Advanced TextBox Control for Asp.Net (Asp.Net Custom Server Control)
Hello friends, we all have been using Asp.Net validation controls with TextBox controls. By default, we have to configure several properties to do a validation using any validation controls. Here I'm introducing a new Custom Server Control which is derived from TextBox control. This control have some additional properties under the Advanced tab on the properties window.
The given below example shows how to create (or setup) an AdvancedTextBox control with builtin logic for validations. AdvancedTextBox control uses the TextBox and validation controls built with Asp.Net .
To develop this control, create a Asp.Net Server Control Project and write the following code.


using System;
using System.Collections.Generic;
using System.ComponentModel;
using System.Linq;
using System.Text;
using System.Web;
using System.Web.UI;
using System.Web.UI.WebControls;

namespace AdvancedTextBox
{
public enum TextType
{
String,
Int,
Double,
Date,
Email,
Url
}

[DefaultProperty("Text")]
[ToolboxData("<{0}:AdvancedTextBox runat=server></{0}:AdvancedTextBox>")]
public class AdvancedTextBox : TextBox
{
private TextType _textType = TextType.String;
private bool _isRequired = false;
List<Control> _controls = new List<Control>();

[Category("Advanced")]
[Description("Text type for the TextBox")]
public TextType TextType
{
set
{
_textType = value;
}
get
{
return _textType;
}
}

[Category("Advanced")]
[Description("Mandatory field or not")]
public bool IsRequired
{
set { _isRequired = value; }
get { return _isRequired; }
}

[Category("Advanced")]
[Description("Minimum range value")]
public string MinimumValue
{
set;
get;
}

[Category("Advanced")]
[Description("Maximum range value")]
public string MaximumValue
{
set;
get;
}
[Category("Advanced")]
[Description("Error Message to be displayed when not entering value.")]
public string RequiredErrorMessage
{
set;
get;
}
[Category("Advanced")]
[Description("Error message to be displayed when type mismatch or range violation.")]
public string TypeOrRangeErrorMessage
{
set;
get;
}

[Category("Advanced")]
[Description("Sets the Text property of associated validation controls")]
public string ValidatorText
{
set;
get;
}

protected override void OnInit(EventArgs e)
{
GenerateControls();
base.OnInit(e);
}

protected void GenerateControls()
{
if (_isRequired)
{
RequiredFieldValidator req = new RequiredFieldValidator();
req.ControlToValidate = this.ID;
req.ForeColor = System.Drawing.Color.Red;
req.ValidationGroup = this.ValidationGroup;
req.ErrorMessage = this.RequiredErrorMessage;
req.Text = this.ValidatorText;
_controls.Add(req);
this.Controls.Add(req);
}
if (this.MinimumValue != null this.MaximumValue != null)
{
RangeValidator rag = new RangeValidator();
rag.ControlToValidate = this.ID;
rag.ForeColor = System.Drawing.Color.Red;
rag.ValidationGroup = this.ValidationGroup;
rag.ErrorMessage = this.TypeOrRangeErrorMessage;
rag.Text = this.ValidatorText;
switch (_textType)
{
case TextType.Int:
rag.Type = ValidationDataType.Integer;
break;
case TextType.Double:
rag.Type = ValidationDataType.Double;
break;
case TextType.Date:
rag.Type = ValidationDataType.Date;
break;
default: rag.Type = ValidationDataType.String;
break;
}

rag.MinimumValue = this.MinimumValue;
rag.MaximumValue = this.MaximumValue;
_controls.Add(rag);
this.Controls.Add(rag);
}
else
{
switch (_textType)
{
case TextType.String:

break;
case TextType.Int:
CompareValidator cv = new CompareValidator();
cv.ControlToValidate = this.ID;
cv.ValidationGroup = this.ValidationGroup;
cv.ForeColor = System.Drawing.Color.Red;
cv.ErrorMessage = this.TypeOrRangeErrorMessage;
cv.Type = ValidationDataType.Integer;
cv.Text = this.ValidatorText;
cv.Operator = ValidationCompareOperator.DataTypeCheck;
_controls.Add(cv);
this.Controls.Add(cv);
break;
case TextType.Double:
cv = new CompareValidator();
cv.ControlToValidate = this.ID;
cv.ValidationGroup = this.ValidationGroup;
cv.ForeColor = System.Drawing.Color.Red;
cv.ErrorMessage = this.TypeOrRangeErrorMessage;
cv.Type = ValidationDataType.Double;
cv.Text = this.ValidatorText;
cv.Operator = ValidationCompareOperator.DataTypeCheck;
_controls.Add(cv);
this.Controls.Add(cv);
break;
case TextType.Date:
cv = new CompareValidator();
cv.ControlToValidate = this.ID;
cv.ValidationGroup = this.ValidationGroup;
cv.ForeColor = System.Drawing.Color.Red;
cv.ErrorMessage = this.TypeOrRangeErrorMessage;
cv.Type = ValidationDataType.Date;
cv.Text = this.ValidatorText;
cv.Operator = ValidationCompareOperator.DataTypeCheck;
_controls.Add(cv);
this.Controls.Add(cv);
break;
case TextType.Email:
RegularExpressionValidator reg = new RegularExpressionValidator();
reg.ControlToValidate = this.ID;
reg.ForeColor = System.Drawing.Color.Red;
reg.ValidationGroup = this.ValidationGroup;
reg.ErrorMessage = this.TypeOrRangeErrorMessage;
reg.Text = this.ValidatorText;
reg.ValidationExpression = @"\w+([-+.']\w+)*@\w+([-.]\w+)*\.\w+([-.]\w+)*";
_controls.Add(reg);
this.Controls.Add(reg);
break;
case TextType.Url:
reg = new RegularExpressionValidator();
reg.ControlToValidate = this.ID;
reg.ForeColor = System.Drawing.Color.Red;
reg.ValidationGroup = this.ValidationGroup;
reg.ErrorMessage = this.TypeOrRangeErrorMessage;
reg.Text = this.ValidatorText;
reg.ValidationExpression = @"http(s)?://([\w-]+\.)+[\w-]+(/[\w- ./?%&amp;=]*)?";
_controls.Add(reg);
this.Controls.Add(reg);
break;
default:
break;
};
}

}
protected override void Render(HtmlTextWriter writer)
{
base.Render(writer);
for (int i = 0; i < _controls.Count; i++)
{
_controls[i].RenderControl(writer);
}
}
}
}


When using this AdvancedTextBox control you can see the "Advanced" tab on the properties window.


  • IsRequired : when you set this property to true, then AdvancedTextBox come up with RequiredFieldValidator control.

  • MaximumValue and MinimumValue: when you set this property AdvancedTextBox come up with a RangeValidatior Control.

  • RequiredErrorMessage: Error message to be set on the Required field validation control.

  • TextType: When you set this property, Advanced TextBox come up with a CompareValidator control to ensure the data type.

  • TypeOrRangeErrorMessage: Error message to be set on either compare validator control or range validator control.

  • ValidatorText: This will be for setting the Text property of the validation controls that are come up with AdvancedTextBox control.

This control will help developers to develop GUI fastly and efficiently without specifying or declaring any validation controls to validate a TextBox.
Hope all of you are doing great programming with AdvancedTextBox Control. Feel free to ask questions and doubts. :-)

Thursday, May 26, 2011

Asp.Net Dynamic Tab Control (Load Usercontrols on each tab)

DynamicTabControl

Recently I had been developing an application, which uses many tab based things. When I looked into the default ajax tab control, I found that when rendering all the tab data is being sent to the client, this will increase the page size dramatically if we have more tabs with a lot of content. I have searched a lot to find a suitable tab control to accomodate my needs, but I was disappointed.

On this occassion I had a spark in my mind and I think about why should I develop a tab control??. This results in DynamicTabControl. Dont get confused by the name, it is not about dynamically creating tabs. It just loading its contents dynamically thats all.

When I started developing the ideas(needs) in my mind are:
1. Should be customizable (the look and feel)
2. Each tab content should be an Asp.Net WebUserControl.
3. Should load contents dynamically on selecting a tab.

Finally I got the result, I have succeeded on developing my ideas.
Follow the following steps to create DynamicTabControl.


1. Create a Asp.Net Server Control Project.( To build an Asp.Net custom server controls.)
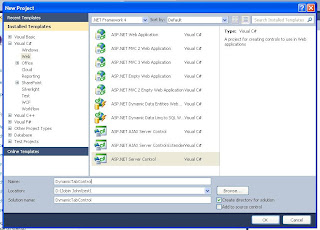


2. Add the DynamicTab class to the project and write the following code.

using System;
using System.Collections.Generic;
using System.Linq;
using System.Text;
using System.Web.UI;
using System.Web.UI.WebControls;

namespace DynamicTabControl
{
    public class DynamicTab
    {
        bool _visible = true;
        bool _enabled = true;
        string _text = "Tab Head";
        bool _selected = false;

public string UserControlPath { get; set; }
public bool Visible { set { _visible = value; } get { return _visible; } } public bool Enabled { set { _enabled = value; } get { return _enabled; } } public string Text { set { _text = value; } get { return _text; } } public bool Selected { set { _selected = value; } get { return _selected; } } public UserControl UserControl { set; get; } }
public class DynamicTabCollection:List<DynamicTab> { } }


3. Add the DynamicTab.css and write the following style definitions

.tabContainer
{
    BACKGROUND-COLOR: #FFFFFF;
    BORDER-TOP: #93BEE2 2PX SOLID;
    BORDER-BOTTOM: #93BEE2 2PX SOLID;
    BORDER-LEFT: #93BEE2 2PX SOLID;
    BORDER-RIGHT: #93BEE2 2PX SOLID;
}

.tabContent
{
    border: 0;
    height: 90%;
    width: 100%;
    border-top: #FFFFFF 5PX SOLID;
    background-color: #FFFFFF;
}

.tabOff
{
    text-align: center;
    font-family: tahoma, verdana, sans-serif;
    font-size: 85%;
    color: #003399;
    background-color: #c4e0f0;
    cursor: HAND;
    text-decoration:none;
    margin-right:5px;
    padding-left:5px;
    padding-right:5px;
}

.tabOn
{
    text-align: center;
    font-family: tahoma, verdana, sans-serif;
    font-size: 85%;
    color: #003399;
    background-color: #FFFFFF;
    cursor: HAND;
    text-decoration:none;
    margin-right:5px;
    padding-left:5px;
    padding-right:5px;
    margin-bottom:0px;
}
.tabHeads
{
    background:#c4e0f0;
}
.tabHeads a:hover
{
    margin-top: 0;
    border-color: White;
    background: White;
    color:#003399;
}


4. Include css file along with dll file. Take properties of DynamicTab.cs and set its Build Action


5. Write the following code in DynamiTabControl.cs file

using System;
using System.Collections.Generic;
using System.ComponentModel;
using System.Linq;
using System.Text;
using System.Web;
using System.Web.UI;
using System.Web.UI.WebControls;

[assembly: WebResource("DynamicTabControl.DynamicTab.css", "text/css")]

namespace DynamicTabControl
{
    [ToolboxData("<{0}:DynamicTabControl runat=server></{0}:DynamicTabControl>")]
    public class DynamicTabControl : WebControl
    {
        DynamicTabCollection _tabs;
        bool IsLoadControlAfterPostback = false;
public DynamicTabControl()
{ _tabs = new DynamicTabCollection(); } [PersistenceMode(PersistenceMode.InnerProperty)] public DynamicTabCollection Tabs { set { _tabs = value; } get { return _tabs; } } protected override void OnInit(EventArgs e) { if (Page.IsPostBack) { IsLoadControlAfterPostback = true; } InitializeControls(); base.OnInit(e); string css = "<link href=\"" + Page.ClientScript.GetWebResourceUrl(this.GetType(), "DynamicTabControl.DynamicTab.css") + "\" type=\"text/css\" rel=\"stylesheet\" />"; Page.ClientScript.RegisterClientScriptBlock(this.GetType(), "cssFile", css, false); } protected override void RenderContents(HtmlTextWriter output) { base.RenderContents(output); } private void InitializeControls() { if (_tabs.Count > 0) { Panel container = new Panel(); container.Width = this.Width; container.CssClass = "tabContainer"; Panel tabHeads = new Panel(); tabHeads.Width = Unit.Percentage(100); tabHeads.CssClass = "tabHeads"; int selCount = _tabs.Count(t => t.Selected); if (selCount == 0) { _tabs[0].Selected = true; } else if (selCount > 1) { throw new Exception("Multiple tabs selected. Please select a single tab"); } DynamicTab selectedTab = null; for (int i = 0; i < _tabs.Count; i++) { var tab = _tabs[i]; if (tab.Visible) { LinkButton lbtn = new LinkButton(); lbtn.ID = "Tab_" + i.ToString(); lbtn.CommandArgument = i.ToString(); lbtn.Click += new EventHandler(lbtn_Click); lbtn.Text = tab.Text; if (tab.Selected) { lbtn.CssClass = "tabOn"; selectedTab = tab; } else { lbtn.CssClass = "tabOff"; } tabHeads.Controls.Add(lbtn); } } Panel content = new Panel(); content.Width = Unit.Percentage(100); content.CssClass = "tabContent"; if (IsLoadControlAfterPostback.Equals(false)) { if (selectedTab.UserControl == null) { content.Controls.Add(this.Page.LoadControl(selectedTab.UserControlPath)); } else { content.Controls.Add(selectedTab.UserControl); } } container.Controls.Add(tabHeads); container.Controls.Add(content); this.Controls.Add(container); } } void lbtn_Click(object sender, EventArgs e) { IsLoadControlAfterPostback = false; var lbtn = sender as LinkButton; foreach (var tab in _tabs) tab.Selected = false; int tabIndex =int.Parse(lbtn.CommandArgument); var selectedTab = _tabs[tabIndex]; selectedTab.Selected = true; Controls.Clear(); InitializeControls(); } } }

6. Build the Server Contro project and Create new Asp.Net web application to host the control.

7. Right click on the toolbox and select Choose Items. Within the popup window browse our DynamicTabControl.dll file and click ok. The below image shows how to choose new control on to toolbox ( I have already choosen DynamicTabControl in the below image).

8. Register our control on the aspx page as shown below.

<%@ Register Assembly="DynamicTabControl" Namespace="DynamicTabControl" TagPrefix="cc2" %>


9. Add four Web User Controls in the project and put some content in each.


10. Place our DynamicTabControl in an asp.net web page and set its tab property as shown below.

<form id="form1" runat="server">
<asp:ScriptManager runat="server">
    </asp:ScriptManager>
    <asp:UpdatePanel ID="UpdatePanel1" runat="server">
    <ContentTemplate>
   
  
    <cc2:DynamicTabControl ID="DynamicTabControl1" runat="server" Width="400">
    <Tabs>
        <cc2:DynamicTab Enabled="true" Selected="true" Text="Tab Head 1"
            UserControlPath="~/UserControls/WebUserControl1.ascx" Visible="true" />
        <cc2:DynamicTab Enabled="true" Selected="false" Text="Tab Head 2"
            UserControlPath="~/UserControls/WebUserControl2.ascx" Visible="true" />
        <cc2:DynamicTab Enabled="true" Selected="false" Text="Tab Head 3"
            UserControlPath="~/UserControls/WebUserControl3.ascx" Visible="true" />
        <cc2:DynamicTab Enabled="true" Selected="false" Text="Tab Head 4"
            UserControlPath="~/UserControls/WebUserControl4.ascx" Visible="true" />
    </Tabs>
    </cc2:DynamicTabControl>


   </ContentTemplate>
    </asp:UpdatePanel>
</form>


Thats all dear friends. now you have developed a DynamicTabControl.!!!!!!!!!!

Enjoy using it....

Wednesday, August 18, 2010

Exporting a Server Control into Microsoft Excel Format

Exporting a Server Control into Microsoft Excel

public void DownLoad(string strFileName)
{
HttpContext.Current.Response.ClearContent();


HttpContext.Current.Response.Buffer = true;


HttpContext.Current.Response.AddHeader("content-disposition", "attachment;filename=" + strFileName);


HttpContext.Current.Response.ContentType = "application/ms-excel";


HttpContext.Current.Response.Charset = "";


StringWriter sw = new StringWriter();


HtmlTextWriter htw = new HtmlTextWriter(sw);
 
Panel1.RenderControl(htw); // here u can use gridview, panel etc.....


HttpContext.Current.Response.Write(sw.ToString());


HttpContext.Current.Response.End();
}


public override void VerifyRenderingInServerForm(Control control)  // u must put this method on the code behind page.

{
}

Sending Emails using Gmail User Account in Asp.Net

To send an email you can use System.Net.MailMessage class.  The following example demonstrates how to send an email using your own Gmail user account.

MailMessage mailMsg = new MailMessage();

mailMsg.From =new MailAddress( yourmail@domain.com);
mailMsg.To.Add( jobinjohn@live.com);
mailMsg.Subject = "Hai";
mailMsg.Body = "Chumma";
mailMsg.Priority = MailPriority.High;
SmtpClient c = new SmtpClient("smtp.gmail.com",587); // or u can use port 465
NetworkCredential cred = new NetworkCredential("username", "password"); //ur account username and password to authenticate your request.
c.Credentials = cred;
c.EnableSsl = true;
try
{
c.Send(mailMsg);
}
catch (Exception ex)
{
Response.Write(ex.Message);
}