Tuesday, October 4, 2011

Software Development Tips and Tricks & Tutorials

Software Development is the process of creating or developing a quality application which will help the business to grow.

Software development process includes the following steps.
  • Understanding the business or Domain : Now you may have a question that "Why should I know the business/domain?. As a programmer my job is only writing codes and developing the application. then why?". The answer is very simple, if you are aware on the domain, I would say it is definitely an added advantage to the software development process.
  • Understanding requirements: Understanding client requirement is one of the important factor in software development.
  • Design: Once we completed the requirement analysis, next we need to design the application. Mostly its done by creating a high level design document and low level design document.
  • Development: Develop the application based on the design document and functional requirement document. While do coding ensure all business validations and requirements are under coverage.
  • Testing: Testing is an investigation conducted to provide the information about the quality of the product/application.
  • Implementation: In this step, we will be deploying the final solution/application which is tested and completed on to the server. While deploying/releasing we will also develop a release document which will help the end user to deploy the application in their enviornment.
  • Maintanance: Maintanance is the modification of a software product after delivery to correct faults or to improve performance.
I hope now you are clear on the Software Development Life Cycle (SDLC) mentioned above.

Here are some Tips and Tricks that might be improve the quality of software development
  • Love your profession
  • Simplify the complex logic by splitting.
  • Be an innovator and expert in technology
  • Be a good learner
  • Be aware of latest technologies
  • Learn the process
  • Minimum amount of sleep should be 6 hours
  • Be social
  • Enjoy holidays and free time
  • Involve in any games during work hours
  • Think positively.

Sunday, September 4, 2011

Using server-side state management in Asp.Net

Using server-side state management

ASP.NET provides two ways to store state on the server and thus share information between Web pages without sending the data to the client. These two methods are referred to as application state and session state. Application state information is global to the application. It is available to all pages regardless of the user requesting the page. Session state is user-specific state that is stored by the server. It is available only to pages accessed by a single user during a visit to your site.

Application State

Application state in ASP.NET is a global storage mechanism for state data that needs to be accessible to all pages in a given Web application. Application state is optional; it is often not required.

You store application state in an instance of the HttpApplicationState class that is provided through the Page.Application property. This class represents a key–value dictionary, where each value is stored and accessed by its key (or name). You can add to and read from the application state from any page on the server.

Eg: place a button and write the following code.


Application["a"] = Convert.ToInt32(Application["a"]) + 1;
Response.Write("Application value = "+Application["a"]);


Session State


Most Web applications need to store user-specific data between individual requests.

Session state can be thought of in a similar way as application state. The big difference is that session state is scoped to the current browser (or user) session and only available to that session (and not the entire application).

Reading and Writing Session State Data:

You store user-specific session state in the Session object. This is an instance of the HttpSessionState class and represents a key–value dictionary collection. Items are added, updated, and read in a similar manner as working with any .NET dictionary collection.

Eg: place a button and write the following code.

Session["a"] = Convert.ToInt32(Session["a"]) + 1;
Response.Write("Session value = "+Session["a"]);


Disabling Session State


If you don’t use session state, you can improve performance by disabling it for the entire application. You do so by setting the sessionState mode property to Off in the Web.config file. The following shows an example:

<configuration>
<system.web>
<sessionState mode="off"/>
</system.web>
</configuration>


You can also disable session state for a single page of an application by setting the EnableSessionState page directive to False. You can also set the EnableSessionState page directive to ReadOnly to provide read-only access to session variables for the given page.
Eg:
<%@ Page Language="C#" AutoEventWireup="true" CodeFile="Default.aspx.cs"
Inherits="_Default" EnableSessionState = "False"%>


Configuring Cookieless Session State


By default, session state uses cookies to track user sessions. This is the best choice for the vast majority of applications. All modern Web browsers support cookies. However, users can turn them off. Therefore, ASP.NET allows you to enable cookieless session state.

Without cookies, ASP.NET tracks sessions using the URL by embedding the session ID in the URL after the application name and before any remaining file or virtual directory identifier.

You enable cookieless sessions through the Web.config file. Set the cookieless attribute of the sessionState element to true.
<configuration>
    <system.web>
      <sessionState cookieless="true"
      regenerateExpiredSessionId="true" />
    </system.web>
  </configuration>


Choosing a Session State Mode


ASP.NET provides a few different session management modes for your application.

InProc: Stores session state in memory on the Web server. This is the default mode. It offers much better performance than using the ASP.NET State Service or storing state information in a database server.

StateServer: Stores session state in a service called the ASP.NET State Service. This ensures that session state is preserved if the Web application is restarted and also makes session state available to multiple Web servers in a Web farm.

SQLServer: Stores session state in a SQL Server database. This ensures that session state is preserved if the Web application is restarted and also makes session state available to multiple servers in a Web farm.

Custom: Enables you to specify a custom session state storage provider. You also need to implement (code) the custom storage provider.

Off: Disables session state. You should disable session state if you are not using it to improve performance.

Tuesday, August 23, 2011

Using Themes in Asp.Net - Example

Using Themes
The Web pages that belong to the same Web site will invariably contain controls that have many properties in common across pages. This includes properties for setting things like background color, font size, foreground color, and other styles. You can manually set the properties for every control on every page in your site. However, that is time consuming, error prone (as you might overlook some settings), and difficult to change (as a change would have to sweep across your entire site). Instead, you can use ASP.NET themes.

ASP.NET themes consist of the following set of elements:

Skins: Skins are files with .skin extensions that contain common property settings for buttons, labels, text boxes, and other controls. Skin files resemble control markups, but contain only the properties you want to define as part of the theme to be applied across pages.

Cascading Style Sheets (CSS ): These are files with .css extensions that contain the style property definitions for HTML markup elements and other custom style classes. A style sheet is linked to a page, master page, or entire site. ASP.NET applies the styles to the page.

Images and other resources: Images (such as a corporate logo) along with other resources can be defined inside a theme. This allows you to switch out the images when you switch themes for a site.

Creating a Theme:

You create themes inside the ASP.NET special folder, App_Themes. This folder sits in your ASP.NET application root. The folder contains separate folders for each theme in your site. You then add the corresponding skins, style sheets, and images to the theme folders.

You need to apply the theme to your site. You can do so at the individual page level by adding the Theme or StyleSheetTheme attribute to the @ Page directive and setting the attribute’s value to the name of your theme (folder name).

Alternatively, you can apply the theme to an entire Web application by adding the

<pages theme="”themeName”">


element or the

<pages stylesheettheme="”themeName”">


element to the Web.config file. This will automatically apply the theme to all pages in your site.

Creating a Skin File

Skin files serve to define default settings for server control appearance attributes. Each server control has attributes for things like font, background color, width, height, and more. Many of these appearance attributes are common among the controls on your site.

A skin file differs from a style sheet in that the skin file uses the attributes of the actual control and not just a set of standard HTML style elements. Skin files contain two types of skins: default and named skins:

Default skins: A default skin automatically applies to all controls of the same type when a theme is applied to a page. A skin is considered a default skin if it does not have a SkinID attribute.

Named skins: A named skin is a control skin with a SkinID property set to a specific name value. Named skins do not automatically apply to controls by type. Instead, you explicitly apply a named skin to a control by setting the ASP.NET control’s SkinID property.

Eg: Default Skins


<asp:Button runat="server" BackColor="#FF3300" BorderStyle="Solid" Font-Bold="True" />


Eg: Named Skins


<asp:Button SkinId="BlueButton" runat="server" BackColor="Blue" BorderStyle="Solid" Font-Bold="True" />


Adding Images to Your Theme
Themes also allow you to switch out the images on your site. This is done through the skin file.

<asp:Image runat="server" SkinId="RedLogo"

ImageUrl="~/App_Themes/RedTheme/RedHead.JPG" />


Adding a Cascading Style Sheet to Your Theme:

A CSS contains style rules that are applied to elements in a Web page. CSS styles define how elements are displayed and where they are positioned on the page.

To add a CSS to your Web site, right-click the name of your theme in Solution Explorer and select Add New Item. You can then select the Style Sheet item template.

body

{
background-color:Black;
}


When the theme is applied to a page, ASP.NET adds a reference to the style sheet to the head element of the page. In the HTML, this reference looks something like the following:

    <link href="SiteStyles.css" rel="themeName/stylesheet" type="text/css" />


Applying a Theme Programmatically:

To apply a theme programmatically, set the page’s Theme property in the Page_PreInit method.
protected void Page_PreInit(object sender, EventArgs e)

{
switch (Request.QueryString["theme"])
{
case "Blue":
Page.Theme = "RedTheme";
break;
case "Pink":
Page.Theme = "PinkTheme";
break;
}
}


Tuesday, July 12, 2011

Using client-side state management in Asp.Net

ASP.NET provides several techniques for storing state information on the client. These include the following:

View state: ASP.NET uses view state to track values in controls between page requests. You can also add your own custom values to the view state.

Control state: Control state allows you to persist information about a control that is not part of the view state. This is useful to custom control developers. If view state is disabled for a control or the page, the control state will still function.

Hidden fields: Like view state, HTML hidden fields store data without displaying that data to the user’s browser. This data is presented back to the server and is available when the form is processed.

Cookies: Cookies store a value in the user’s browser that the browser sends with every page request to the same server. Cookies are the best way to store state data that must be available for multiple Web pages on an entire Web site.

Query strings: Query strings are values stored at the end of the URL. These values are visible to the user through his or her browser’s address bar. Use query strings when you want a user to be able to e-mail or instant message state data within a URL.

ViewState: View state is the default mechanism used by ASP.NET to store user-specific request and response data between page requests. The data being stored is typically specific to the controls on the page. View state stores object data that is not already represented as HTML in the page response. This ensures that data set on the server is preserved between round trips to the client and the server.

The Page.ViewState property provides a dictionary object for retaining values between multiple requests for the same page. This object is of the type StateBag. When an ASP.NET page is processed, the current state of the page and its controls is hashed into a string and saved in the page as an HTML hidden field called __ViewState.


Reading and Writing Custom View State Data:
You can use view state to add and retrieve custom values that you need persisted between page requests.

Adding data to the view state is great when you need the information passed back to the server as part of the page post. However, the content of the view state is for that page only. The view state does not transfer from one Web page to another. Therefore, it is useful only for temporarily storing values between requests to a single page.

Eg:
Place a button and write the following code on its click event.

ViewState["a"] = Convert.ToInt32(ViewState["a"]) + 1;
Response.Write("viewstate value = "+ViewState["a"]);


Hidden Fields
Hidden fields in HTML are simply input fields that are embedded in a page’s HTML, not displayed to the user (unless the user chooses to view the page’s source), and then sent back to the server on the page post.

Like view state, hidden fields only store information for a single page. Therefore, they are not useful for storing session data that is used between page requests. Unlike view state, hidden fields have no built-in compression, encryption, hashing, or chunking. Therefore users can view or modify data stored in hidden fields.

Eg: place a HiddenField and set its initial value into zero. Place a button too and write the following on its click event.

HiddenField1.Value = (Convert.ToInt32(HiddenField1.Value) + 1).ToString();
Response.Write("Hidden value = "+HiddenField1.Value);

Cookies : A cookie is a small amount of data that you write to the client to be stored and then passed with requests to your site.

You write persistent cookies to a text file on the client machine. These cookies are meant to survive the user shutting down the browser and reopening it at a later time. You can also write temporary cookies to the memory of the client’s browser. These cookies are used only during the given Web session. They are lost when the browser closes.

Reading and Writing Cookies

Eg:

    protected void btnCreate_Click(object sender, EventArgs e)
{
HttpCookie c = new HttpCookie("mycookie");
c.Value = "Jobin John";
c.Expires = DateTime.Now.AddDays(3);
Response.Cookies.Add(c);
}
protected void btnRead_Click(object sender, EventArgs e)
{
HttpCookie c = Request.Cookies["mycookie"];
if (c != null)
{
Response.Write(c.Value);
}
}
protected void btnDelete_Click(object sender, EventArgs e)
{
HttpCookie c = Request.Cookies["mycookie"];
if (c != null)
{
c.Expires = DateTime.Now.AddDays(-1);
Response.Cookies.Add(c);
}
}

Storing Multiple Values in a Cookie: The size of your cookie is dependent on the browser. Each cookie can be up to a maximum of 4 KB in length. In addition, you can typically store up to 20 cookies per site.


protected void btnCreate_Click(object sender, EventArgs e)
{
HttpCookie c = new HttpCookie("mycookie");
c["site"] = "http://www.certifications4you.com/";
c["date"] = DateTime.Now.ToString();
c.Expires = DateTime.Now.AddDays(3);
Response.Cookies.Add(c);
}
protected void btnRead_Click(object sender, EventArgs e)
{
HttpCookie c = Request.Cookies["mycookie"];

if (c != null)
{
Response.Write(c["site"]+"<br>"+c["date"]);
}
}
protected void btnDelete_Click(object sender, EventArgs e)
{
HttpCookie c = Request.Cookies["mycookie"];
if (c != null)
{
c.Expires = DateTime.Now.AddDays(-1);
Response.Cookies.Add(c);
}
}

Query Strings
Query string values are appended to the end of the page URL. They are set off with a question mark (?) followed by the query string term (or parameter name) followed by an equal sign (=) and the given parameter’s value. You can append multiple query string parameters using the ampersand (&).

Values sent to your page via the query string can be retrieved on the server through the Page.Request.QueryString property

Eg:
Add two Login.aspx and Home asp.x. place three buttons in the
Login.aspx:
Response.Redirect("home.aspx?user="+txtUserName.Text;

string username=Request.QueryString["user"].ToString();
Response.Write(username);

on Home.aspx's page load:
Response.Redirect("home.aspx?user="+txtUserName.Tex+"&pass="+txtPassword.Text);
string username=Request.QueryString["user"].ToString();
string password=Request.QueryString["pass"].ToString();
Response.Write(username+ " " +password);

Thursday, July 7, 2011

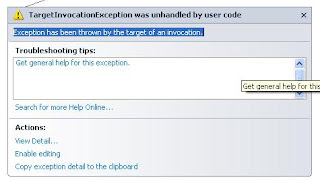
TargetInvocationException was unhandled by user code - Solution

I had been working with an Asp.Net Dynamic Data Web Application, I got an error while debugging the application.

TargetInvocationException was unhandled by user code : Exception has been thrown by the target of an invocation.


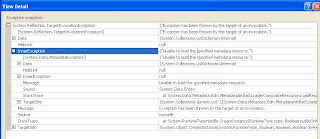
This error was because of the wrong filename in the entity connection string. I have fixed this and got it working.

If connection string is not exist in web.config, we will get the same error while debugging.

Note : always check the inner exception details when you are facing this error. This will help you to track out the actual exception caused the error.

Monday, July 4, 2011

Customizing QueryableFilterRepeater Control - Aligning controls

Hi all, Here is a simple solution for customizing the QueryableFilterRepeater control. By default this control adds the filter controls without any alignment, so we should do it manually.
                <table>
<tr>
<td style="width:100%;">
<asp:QueryableFilterRepeater runat="server" ID="FilterRepeater">
<ItemTemplate>
<div class="SearchColumn">
<asp:Label runat="server" Text='<%# Eval("DisplayName") %>' OnPreRender="Label_PreRender" />
<asp:DynamicFilter runat="server" ID="DynamicFilter" OnFilterChanged="DynamicFilter_FilterChanged" />
</div>
</ItemTemplate>
</asp:QueryableFilterRepeater>
</td>
</tr>
</table>

here is the css class used.
div.SearchColumn
{
float:left;
width:48%;
margin:2px 2px 2px 2px;
}