Sunday, November 27, 2011

FILESTREAM in Sql Server 2008 and Example

FILESTREAM in SQL Server 2008

SQL Server 2008 introduces the new FILESTREAM attribute, which can be applied to the varbinary(max) data type. Using FILESTREAM, you can exceed the 2GB limit on stored values and take advantage of relational handling of files via SQL Server, while actually storing the files on the file system. BACKUP and RESTORE operations maintain both the database data as well as the files saved on the file system, thus handling end-to-end data recoverability for applications that store both structured and unstructured data. FILESTREAM marries the transactional consistency capabilities of SQL Server with the performance advantages of NT file system streaming.

SQL Server can manage the contents of the FILESTREAM containers on the file system for you and control access to the files, while the NT File System (NTFS) provides efficient file streaming and file system transaction support. This combination of SQL Server and NTFS functionality provides several advantages when dealing with LOB data, including increased efficiency, manageability, and concurrency.

Check whether the filestream property is enabled or not. To do this executes the following query.
SELECT SERVERPROPERTY('FilestreamShareName') ShareName,
SERVERPROPERTY('FilestreamEffectiveLevel') EffectiveLevel,
SERVERPROPERTY('FilestreamConfiguredLevel') ConfiguredLevel


If it is not enable use sp_configure procedure to enable it.
EXEC sp_ configure 'filestream access level', 2;
GO
RECONFIGURE;
GO


FILESTREAM Access Levels:


0. Disable

1. Access via T-SQL only

2. Access via T-SQL only and file system

Once you’ve enabled FILESTREAM support on your SQL Server instance, you have to create a SQL Server file group with the CONTAINS FILESTREAM option. This file group is where SQL Server will store FILESTREAM BLOB files.
Example:
CREATE DATABASE Jobin ON PRIMARY
(
NAME='Jobin_Data',
FILENAME='E:\Jobin\sql\jobin.mdf'
),
FILEGROUP DocumentFileStreamGroup CONTAINS FILESTREAM
(
NAME='FileStreamdocuments',
FILENAME='E:\Jobin\sql\jobin_documents'
)
LOG ON
(
NAME='Jobin_Log',
FILENAME='E:\Jobin\sql\jobin.ldf'
);


To enable FileStream to an existing database execute the following query

-- to add filestream to an existing database
ALTER DATABASE Jobin
ADD FILEGROUP DocumentFileStreamGroup CONTAINS FILESTREAM;
GO
ALTER DATABASE Jobin
ADD FILE
(
NAME = 'FileStreamdocuments'
FILENAME = 'E:\Jobin\sql\jobin_documents'
)
TO FILEGROUP DocumentFileStreamGroup;


FILESTREAM Enabled Tables


Once you’ve enabled FILESTREAM on the server instance and created a FILESTREAM filegroup, you’re ready to create FILESTREAM-enabled tables. FILESTREAM storage is accessed by creating a varbinary (max) column in a table with the FILESTREAM attribute. The FILESTREAM-enabled table must also have a uniqueidentifier column with a ROWGUIDCOL attribute.

CREATE TABLE Employee
(
EmpId UNIQUEIDENTIFIER ROWGUIDCOL PRIMARY KEY,
Name VARCHAR(50),
Document VARBINARY(MAX) FILESTREAM
)


Insert some records into the table.
INSERT INTO Employee VALUES(NEWID(),'Jobin',CAST('jobin john' AS VARBINARY(MAX)));
INSERT INTO Employee VALUES(NEWID(),'Ajith',CAST('Software Engineer' AS VARBINARY(MAX)));


Select the inserted values
SELECT * FROM Employee
SELECT EmpId,Name,CAST(Document AS VARCHAR) AS Document FROM Employee

Monday, October 24, 2011

Introducing Microsoft Visual Studio LightSwitch 2011

Microsoft Visual Studio LightSwitch 2011

Microsoft Visual Studio LightSwitch is a simplified self-service development tool that enables you to build business applications quickly and easily for the desktop and cloud or it is a development tool that helps you build business applications quickly. LightSwitch provides a simplified development environment that enables you to concentrate on the business logic instead of the application infrastructure.

LightSwitch heps us to develop business applications simply and fastly. LightSwitch is optimized around making data and screens, this would reduce the development effort.

Microsoft Visual Studio LightSwitch uses a model-centric architecture for defining, building, and executing a LightSwitch application.

Monday, October 17, 2011

Error during serialization or deserialization using the JSON JavaScriptSerializer. The length of the string exceeds the value set on the maxJsonLength property


Fix JSON serialization error by setting maxJsonLength.

This error is occured when serialize an object in JSON string by JavaScriptSerializer class, it will throw this exception if object contains too many records(data). We can fix this issue by setting maxJsonLength in web.config file.
Exception type: InvalidOperationException
Exception message: Error during serialization or deserialization using the JSON JavaScriptSerializer. The length of the string exceeds the value set on the maxJsonLength property.


<configuration>
     <system.web.extensions>
        <scripting>
            <webServices>
                <jsonSerialization maxJsonLength="50000000"/>
            </webServices>
        </scripting>
    </system.web.extensions>
 </configuration> .

Tuesday, October 4, 2011

Software Development Tips and Tricks & Tutorials

Software Development is the process of creating or developing a quality application which will help the business to grow.

Software development process includes the following steps.
  • Understanding the business or Domain : Now you may have a question that "Why should I know the business/domain?. As a programmer my job is only writing codes and developing the application. then why?". The answer is very simple, if you are aware on the domain, I would say it is definitely an added advantage to the software development process.
  • Understanding requirements: Understanding client requirement is one of the important factor in software development.
  • Design: Once we completed the requirement analysis, next we need to design the application. Mostly its done by creating a high level design document and low level design document.
  • Development: Develop the application based on the design document and functional requirement document. While do coding ensure all business validations and requirements are under coverage.
  • Testing: Testing is an investigation conducted to provide the information about the quality of the product/application.
  • Implementation: In this step, we will be deploying the final solution/application which is tested and completed on to the server. While deploying/releasing we will also develop a release document which will help the end user to deploy the application in their enviornment.
  • Maintanance: Maintanance is the modification of a software product after delivery to correct faults or to improve performance.
I hope now you are clear on the Software Development Life Cycle (SDLC) mentioned above.

Here are some Tips and Tricks that might be improve the quality of software development
  • Love your profession
  • Simplify the complex logic by splitting.
  • Be an innovator and expert in technology
  • Be a good learner
  • Be aware of latest technologies
  • Learn the process
  • Minimum amount of sleep should be 6 hours
  • Be social
  • Enjoy holidays and free time
  • Involve in any games during work hours
  • Think positively.

Sunday, September 4, 2011

Using server-side state management in Asp.Net

Using server-side state management

ASP.NET provides two ways to store state on the server and thus share information between Web pages without sending the data to the client. These two methods are referred to as application state and session state. Application state information is global to the application. It is available to all pages regardless of the user requesting the page. Session state is user-specific state that is stored by the server. It is available only to pages accessed by a single user during a visit to your site.

Application State

Application state in ASP.NET is a global storage mechanism for state data that needs to be accessible to all pages in a given Web application. Application state is optional; it is often not required.

You store application state in an instance of the HttpApplicationState class that is provided through the Page.Application property. This class represents a key–value dictionary, where each value is stored and accessed by its key (or name). You can add to and read from the application state from any page on the server.

Eg: place a button and write the following code.


Application["a"] = Convert.ToInt32(Application["a"]) + 1;
Response.Write("Application value = "+Application["a"]);


Session State


Most Web applications need to store user-specific data between individual requests.

Session state can be thought of in a similar way as application state. The big difference is that session state is scoped to the current browser (or user) session and only available to that session (and not the entire application).

Reading and Writing Session State Data:

You store user-specific session state in the Session object. This is an instance of the HttpSessionState class and represents a key–value dictionary collection. Items are added, updated, and read in a similar manner as working with any .NET dictionary collection.

Eg: place a button and write the following code.

Session["a"] = Convert.ToInt32(Session["a"]) + 1;
Response.Write("Session value = "+Session["a"]);


Disabling Session State


If you don’t use session state, you can improve performance by disabling it for the entire application. You do so by setting the sessionState mode property to Off in the Web.config file. The following shows an example:

<configuration>
<system.web>
<sessionState mode="off"/>
</system.web>
</configuration>


You can also disable session state for a single page of an application by setting the EnableSessionState page directive to False. You can also set the EnableSessionState page directive to ReadOnly to provide read-only access to session variables for the given page.
Eg:
<%@ Page Language="C#" AutoEventWireup="true" CodeFile="Default.aspx.cs"
Inherits="_Default" EnableSessionState = "False"%>


Configuring Cookieless Session State


By default, session state uses cookies to track user sessions. This is the best choice for the vast majority of applications. All modern Web browsers support cookies. However, users can turn them off. Therefore, ASP.NET allows you to enable cookieless session state.

Without cookies, ASP.NET tracks sessions using the URL by embedding the session ID in the URL after the application name and before any remaining file or virtual directory identifier.

You enable cookieless sessions through the Web.config file. Set the cookieless attribute of the sessionState element to true.
<configuration>
    <system.web>
      <sessionState cookieless="true"
      regenerateExpiredSessionId="true" />
    </system.web>
  </configuration>


Choosing a Session State Mode


ASP.NET provides a few different session management modes for your application.

InProc: Stores session state in memory on the Web server. This is the default mode. It offers much better performance than using the ASP.NET State Service or storing state information in a database server.

StateServer: Stores session state in a service called the ASP.NET State Service. This ensures that session state is preserved if the Web application is restarted and also makes session state available to multiple Web servers in a Web farm.

SQLServer: Stores session state in a SQL Server database. This ensures that session state is preserved if the Web application is restarted and also makes session state available to multiple servers in a Web farm.

Custom: Enables you to specify a custom session state storage provider. You also need to implement (code) the custom storage provider.

Off: Disables session state. You should disable session state if you are not using it to improve performance.

Tuesday, August 23, 2011

Using Themes in Asp.Net - Example

Using Themes
The Web pages that belong to the same Web site will invariably contain controls that have many properties in common across pages. This includes properties for setting things like background color, font size, foreground color, and other styles. You can manually set the properties for every control on every page in your site. However, that is time consuming, error prone (as you might overlook some settings), and difficult to change (as a change would have to sweep across your entire site). Instead, you can use ASP.NET themes.

ASP.NET themes consist of the following set of elements:

Skins: Skins are files with .skin extensions that contain common property settings for buttons, labels, text boxes, and other controls. Skin files resemble control markups, but contain only the properties you want to define as part of the theme to be applied across pages.

Cascading Style Sheets (CSS ): These are files with .css extensions that contain the style property definitions for HTML markup elements and other custom style classes. A style sheet is linked to a page, master page, or entire site. ASP.NET applies the styles to the page.

Images and other resources: Images (such as a corporate logo) along with other resources can be defined inside a theme. This allows you to switch out the images when you switch themes for a site.

Creating a Theme:

You create themes inside the ASP.NET special folder, App_Themes. This folder sits in your ASP.NET application root. The folder contains separate folders for each theme in your site. You then add the corresponding skins, style sheets, and images to the theme folders.

You need to apply the theme to your site. You can do so at the individual page level by adding the Theme or StyleSheetTheme attribute to the @ Page directive and setting the attribute’s value to the name of your theme (folder name).

Alternatively, you can apply the theme to an entire Web application by adding the

<pages theme="”themeName”">


element or the

<pages stylesheettheme="”themeName”">


element to the Web.config file. This will automatically apply the theme to all pages in your site.

Creating a Skin File

Skin files serve to define default settings for server control appearance attributes. Each server control has attributes for things like font, background color, width, height, and more. Many of these appearance attributes are common among the controls on your site.

A skin file differs from a style sheet in that the skin file uses the attributes of the actual control and not just a set of standard HTML style elements. Skin files contain two types of skins: default and named skins:

Default skins: A default skin automatically applies to all controls of the same type when a theme is applied to a page. A skin is considered a default skin if it does not have a SkinID attribute.

Named skins: A named skin is a control skin with a SkinID property set to a specific name value. Named skins do not automatically apply to controls by type. Instead, you explicitly apply a named skin to a control by setting the ASP.NET control’s SkinID property.

Eg: Default Skins


<asp:Button runat="server" BackColor="#FF3300" BorderStyle="Solid" Font-Bold="True" />


Eg: Named Skins


<asp:Button SkinId="BlueButton" runat="server" BackColor="Blue" BorderStyle="Solid" Font-Bold="True" />


Adding Images to Your Theme
Themes also allow you to switch out the images on your site. This is done through the skin file.

<asp:Image runat="server" SkinId="RedLogo"

ImageUrl="~/App_Themes/RedTheme/RedHead.JPG" />


Adding a Cascading Style Sheet to Your Theme:

A CSS contains style rules that are applied to elements in a Web page. CSS styles define how elements are displayed and where they are positioned on the page.

To add a CSS to your Web site, right-click the name of your theme in Solution Explorer and select Add New Item. You can then select the Style Sheet item template.

body

{
background-color:Black;
}


When the theme is applied to a page, ASP.NET adds a reference to the style sheet to the head element of the page. In the HTML, this reference looks something like the following:

    <link href="SiteStyles.css" rel="themeName/stylesheet" type="text/css" />


Applying a Theme Programmatically:

To apply a theme programmatically, set the page’s Theme property in the Page_PreInit method.
protected void Page_PreInit(object sender, EventArgs e)

{
switch (Request.QueryString["theme"])
{
case "Blue":
Page.Theme = "RedTheme";
break;
case "Pink":
Page.Theme = "PinkTheme";
break;
}
}


Tuesday, July 12, 2011

Using client-side state management in Asp.Net

ASP.NET provides several techniques for storing state information on the client. These include the following:

View state: ASP.NET uses view state to track values in controls between page requests. You can also add your own custom values to the view state.

Control state: Control state allows you to persist information about a control that is not part of the view state. This is useful to custom control developers. If view state is disabled for a control or the page, the control state will still function.

Hidden fields: Like view state, HTML hidden fields store data without displaying that data to the user’s browser. This data is presented back to the server and is available when the form is processed.

Cookies: Cookies store a value in the user’s browser that the browser sends with every page request to the same server. Cookies are the best way to store state data that must be available for multiple Web pages on an entire Web site.

Query strings: Query strings are values stored at the end of the URL. These values are visible to the user through his or her browser’s address bar. Use query strings when you want a user to be able to e-mail or instant message state data within a URL.

ViewState: View state is the default mechanism used by ASP.NET to store user-specific request and response data between page requests. The data being stored is typically specific to the controls on the page. View state stores object data that is not already represented as HTML in the page response. This ensures that data set on the server is preserved between round trips to the client and the server.

The Page.ViewState property provides a dictionary object for retaining values between multiple requests for the same page. This object is of the type StateBag. When an ASP.NET page is processed, the current state of the page and its controls is hashed into a string and saved in the page as an HTML hidden field called __ViewState.


Reading and Writing Custom View State Data:
You can use view state to add and retrieve custom values that you need persisted between page requests.

Adding data to the view state is great when you need the information passed back to the server as part of the page post. However, the content of the view state is for that page only. The view state does not transfer from one Web page to another. Therefore, it is useful only for temporarily storing values between requests to a single page.

Eg:
Place a button and write the following code on its click event.

ViewState["a"] = Convert.ToInt32(ViewState["a"]) + 1;
Response.Write("viewstate value = "+ViewState["a"]);


Hidden Fields
Hidden fields in HTML are simply input fields that are embedded in a page’s HTML, not displayed to the user (unless the user chooses to view the page’s source), and then sent back to the server on the page post.

Like view state, hidden fields only store information for a single page. Therefore, they are not useful for storing session data that is used between page requests. Unlike view state, hidden fields have no built-in compression, encryption, hashing, or chunking. Therefore users can view or modify data stored in hidden fields.

Eg: place a HiddenField and set its initial value into zero. Place a button too and write the following on its click event.

HiddenField1.Value = (Convert.ToInt32(HiddenField1.Value) + 1).ToString();
Response.Write("Hidden value = "+HiddenField1.Value);

Cookies : A cookie is a small amount of data that you write to the client to be stored and then passed with requests to your site.

You write persistent cookies to a text file on the client machine. These cookies are meant to survive the user shutting down the browser and reopening it at a later time. You can also write temporary cookies to the memory of the client’s browser. These cookies are used only during the given Web session. They are lost when the browser closes.

Reading and Writing Cookies

Eg:

    protected void btnCreate_Click(object sender, EventArgs e)
{
HttpCookie c = new HttpCookie("mycookie");
c.Value = "Jobin John";
c.Expires = DateTime.Now.AddDays(3);
Response.Cookies.Add(c);
}
protected void btnRead_Click(object sender, EventArgs e)
{
HttpCookie c = Request.Cookies["mycookie"];
if (c != null)
{
Response.Write(c.Value);
}
}
protected void btnDelete_Click(object sender, EventArgs e)
{
HttpCookie c = Request.Cookies["mycookie"];
if (c != null)
{
c.Expires = DateTime.Now.AddDays(-1);
Response.Cookies.Add(c);
}
}

Storing Multiple Values in a Cookie: The size of your cookie is dependent on the browser. Each cookie can be up to a maximum of 4 KB in length. In addition, you can typically store up to 20 cookies per site.


protected void btnCreate_Click(object sender, EventArgs e)
{
HttpCookie c = new HttpCookie("mycookie");
c["site"] = "http://www.certifications4you.com/";
c["date"] = DateTime.Now.ToString();
c.Expires = DateTime.Now.AddDays(3);
Response.Cookies.Add(c);
}
protected void btnRead_Click(object sender, EventArgs e)
{
HttpCookie c = Request.Cookies["mycookie"];

if (c != null)
{
Response.Write(c["site"]+"<br>"+c["date"]);
}
}
protected void btnDelete_Click(object sender, EventArgs e)
{
HttpCookie c = Request.Cookies["mycookie"];
if (c != null)
{
c.Expires = DateTime.Now.AddDays(-1);
Response.Cookies.Add(c);
}
}

Query Strings
Query string values are appended to the end of the page URL. They are set off with a question mark (?) followed by the query string term (or parameter name) followed by an equal sign (=) and the given parameter’s value. You can append multiple query string parameters using the ampersand (&).

Values sent to your page via the query string can be retrieved on the server through the Page.Request.QueryString property

Eg:
Add two Login.aspx and Home asp.x. place three buttons in the
Login.aspx:
Response.Redirect("home.aspx?user="+txtUserName.Text;

string username=Request.QueryString["user"].ToString();
Response.Write(username);

on Home.aspx's page load:
Response.Redirect("home.aspx?user="+txtUserName.Tex+"&pass="+txtPassword.Text);
string username=Request.QueryString["user"].ToString();
string password=Request.QueryString["pass"].ToString();
Response.Write(username+ " " +password);
Thursday, July 7, 2011

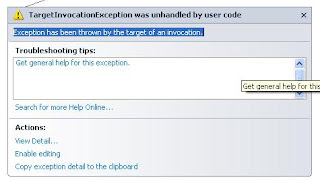
TargetInvocationException was unhandled by user code - Solution

I had been working with an Asp.Net Dynamic Data Web Application, I got an error while debugging the application.

TargetInvocationException was unhandled by user code : Exception has been thrown by the target of an invocation.


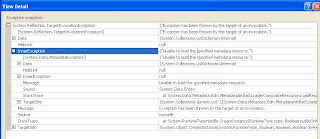
This error was because of the wrong filename in the entity connection string. I have fixed this and got it working.

If connection string is not exist in web.config, we will get the same error while debugging.

Note : always check the inner exception details when you are facing this error. This will help you to track out the actual exception caused the error.

Monday, July 4, 2011

Customizing QueryableFilterRepeater Control - Aligning controls

Hi all, Here is a simple solution for customizing the QueryableFilterRepeater control. By default this control adds the filter controls without any alignment, so we should do it manually.
                <table>
<tr>
<td style="width:100%;">
<asp:QueryableFilterRepeater runat="server" ID="FilterRepeater">
<ItemTemplate>
<div class="SearchColumn">
<asp:Label runat="server" Text='<%# Eval("DisplayName") %>' OnPreRender="Label_PreRender" />
<asp:DynamicFilter runat="server" ID="DynamicFilter" OnFilterChanged="DynamicFilter_FilterChanged" />
</div>
</ItemTemplate>
</asp:QueryableFilterRepeater>
</td>
</tr>
</table>

here is the css class used.
div.SearchColumn
{
float:left;
width:48%;
margin:2px 2px 2px 2px;
}

Sunday, June 26, 2011

.Net Interview Questions - OOP

What is Object Oriented Programming (OOP)?
Object-oriented programming (OOP) is a programming language model organized around objects. At this poing you may have a question in your mind, what is an object? its simple, an object can be anything which has some attributes and hehaviour. For example, hope now you are infront of a computer monitor, the monitor itself is an object, it has a lot of attributes like Make, Size, Type etc...

In OOP we use classes and objects to represent our data and logic. For example consider the following C# example.

public class Monitor
{
public string Make
{
set;
get;
}

public int Height
{
set;
get;
}

//etc......

}
The above class defines a structure of the computer monitor. An object of this class can represent a computer monitor.
OOP Concepts


  1. Data Abstraction : The act of representing essential features without showing the back ground details.

  2. Data Encapsulation: The wrapping up of data together into a single unit.

  3. Inheritance: The act of inheriting properties of an object into another.

  4. Polymorphism: The ability of a data to behave in multiple forms.

Possible questions about OOP concepts from a .NET stand point are:


  1. What is Data Abstraction? ans: see above definition

  2. What is Encapsulation? ans: see above definition

  3. What is inheritance? ans: see above definition

  4. What is Polymorphism? ans: see above definition

  5. Does .Net support multiple inheritance? ans: no

  6. Example for polymorphism? ans:function overloading, overriding and operator overloading

  7. Real world example for data abstraction? ans: when we press the start switch of a car or bike will get started, we might not need to know the internal process. we gave an input and we got an outcome.

  8. What is a class and an object? ans: class is a blueprint for creating objects. An object is an instance of a class and it have the properties and behaviours defined in the class.

Namespace in C# and its Advantages

Namespaces are a way of grouping type names and reducing the chance of name collisions. A namespace can contain both other namespaces and types. The namespace keyword is used to declare a scope.

We can organize our types based on their bahaviour and functionalities. For example consider the following example. Suppose you have a collection of songs, how will you store it in your computer? normally one do this by creating root folder named "Songs" then create sub folders based on song types, then create subfolders for albums etc....

Have a look on the following C# example to understand the advantages of the namespace.

namespace Songs
{
public class Songs
{
public void PlayAll()
{
Console.WriteLine("Playing all songs..");
}
}
namespace English
{
public class Titanic
{
public void Play()
{
Console.WriteLine("Playing titanic..");
}
}
}
namespace Malayalam
{
public class Urumi
{
public void Play()
{
Console.WriteLine("Playing urumi.....");
}
}
}
}

Thursday, June 23, 2011

SQL Server Views Tutorial - Create, Alter, Insert, Update, Delete etc..

SQL Server Views
Views allow you to create a virtual representation of table data defined by a SELECT statement.


Views can be used to simplify data access for query writers, obscuring the underlying complexity of the SELECT statement.


Views are also useful for managing security and protecting sensitive data. If you wish to restrict direct table access by the end user, you can grant permissions exclusively to views, rather than to the underlying tables. You can also use views to expose only those columns that you wish the end user to see, including just the necessary columns in the view definition.


Views work as an interface between database tables and user.


You cannot use certain SELECT elements in a view definition, including INTO, OPTION, COMPUTE, COMPUTE BY or ORDER BY. We cannot reference a temporary table.


Views can be used for different purposes:


  • To restrict the use of particular columns and/or rows of tables.

  • To hide the details of complicated queries. If database applications need queries that involve complicated join operations, the creation of corresponding views can simplify the use of such queries

CREATE VIEW Statement:
A view is created using the CREATE VIEW statement.

/*
create a view for viewing data within the table
Teachers for the user student
*/
CREATE VIEW Student.vu_SelectTeachers
AS
SELECT Name,JobTitle FROM Teacher.Teachers
GO

/*
select data by using the view
*/
SELECT * FROM Student.vu_SelectTeachers
Eg:
/*
create a view for the user teacher
*/
CREATE VIEW Teacher.vu_SelectTeachers
AS
SELECT Id, Name, JobTitle from Teacher.Teachers
GO

/*
select data
*/
SELECT * FROM Teacher.vu_SelectTeachers


Altering and Removing Views
ALTER VIEW statement is used to modify the definition of the view query. The DROP VIEW statement removes the definition of the specified view from the system tables.
Eg:


/*
Altering views
*/
ALTER VIEW Student.vu_SelectTeachers
AS
SELECT Name,JobTitle,Phone from Teacher.Teachers
GO
Eg:
/*
remove a view
*/
DROP VIEW Student.vu_SelectTeachers


INSERT, UPDATE and DELETE statement and VIEW
A view can be used with the INSERT, UPDATE and DELETE statements. When a view is used to insert, update or delete, the rows are actually insert, update or delete into the underlying base table.
The inserting, updating and deleting of rows into the underlying tables is not possible if the corresponding view contains any of the following features:


  • The FROM clause in the view definition involves two or more tables and the column list includes columns from more than one table

  • A column of the view is derived from an aggregate function

  • The SELECT statement in the view contains the GROUP BY clause or the DISTINCT option

  • A column of the view is derived from a constant or an expression (except in the case of deletion)


/*
INSERT, UPDATE and DELETE with Views
*/
INSERT INTO Teacher.vu_SelectTeachers(Id, Name,JobTitle) VALUES(4,'jobin','Faculty')

UPDATE Teacher.vu_SelectTeachers SET JobTitle='Trainer' WHERE Id=4

DELETE Teacher.vu_SelectTeachers WHERE Id=4


WITH Encryption:
The WITH ENCRYPTION option encrypts the SELECT statement, thus enhancing the security of the database system. Software vendors who use SQL Server in the back end often encrypt their views or stored procedures in order to prevent tampering or reverse-engineering from clients or competitors. If you use encryption, be sure to save the original, unencrypted definition.

Eg:
/*
creating a view with Encryption
*/
CREATE VIEW Teacher.vu_SelectTeachers
WITH ENCRYPTION
AS
SELECT Id, Name, JobTitle from Teacher.Teachers
GO


WITH SCHEMABINDING
The SCHEMABINDING clause binds the view to the schema of the underlying table. Creating a view with the SCHEMABINDING option locks the tables being referred by the view and prevents any changes that may change the table schema.

Notice two important points while creating a view with SCHEMABINDING OPTION:


  • The objects should be referred to by their owner names [two part name].

  • SELECT * is not permitted.

/*
create schema with SCHEMABINDING
*/
DROP VIEW Teacher.vu_SelectTeachers

CREATE VIEW Teacher.vu_SelectTeachers
WITH SCHEMABINDING
AS
SELECT Id, Name, JobTitle from Teacher.Teachers
GO

/*
try to change schema of tale Teacher
*/
alter schema student TRANSFER Teacher.Teachers
alter schema teacher TRANSFER student.Teachers


WITH CHECK OPTION
The option WITH CHECK OPTION is used to restrict the insertion of only such rows that satisfy the conditions of the query. If this option is used, Database Engine tests every inserted row to ensure that the conditions in the WHERE clause are evaluated to true.

/*
create schema with CHECK OPTION
*/
DROP VIEW Teacher.vu_SelectTeachers

CREATE VIEW Teacher.vu_SelectTeachers
AS
SELECT Id, Name, JobTitle FROM Teacher.Teachers WHERE JobTitle='faculty'
WITH CHECK OPTION
GO

-- insertion fails on the following query because not faculty
INSERT INTO Teacher.vu_SelectTeachers(Id, Name, JobTitle) VALUES (5,'fff','Manager')
--insertion succeed on the following query because his JobTitle is faculty
INSERT INTO Teacher.vu_SelectTeachers(Id, Name, JobTitle) VALUES (5,'fff','faculty')

Monday, June 20, 2011

Styling Asp.Net Menu control with CSS - Example

Hello friends, here is an example to styling asp.net menu control by using a simple css and a background image. Hope it will help you

To create this stylish menu follow the following steps.

1. Create Menu.css file and type the following css code.

.Menu
{

}

.Menu ul
{
background:#7795BD;
}

.Menu ul li
{
background:#7795BD url(menu_bg.gif) repeat-x;
text-align:center;
/* set width if needed.*/
width:200px;
}

.Menu ul li a
{
color: black;
padding: 4px 2px 4px;
padding-left:8px !important;
border:1px solid #648ABD;
border-bottom: 0;
}

.Menu ul li a:hover
{
background-image: none;
}

.Menu ul li a:hover
{
color: White;
}

.Menu ul li a
{
color: Black;
}


2. add the following image into the web application.


3. place menu control and set the CssClass property as given below

<asp:Menu ID="Menu1" runat="server" Orientation="Horizontal" CssClass="Menu">

<Items>
<asp:MenuItem NavigateUrl="#" Text="New Item" Value="New Item">
<asp:MenuItem NavigateUrl="#" Text="New Item" Value="New Item"></asp:MenuItem>
<asp:MenuItem NavigateUrl="#" Text="New Item New Item" Value="New Item"></asp:MenuItem>
<asp:MenuItem NavigateUrl="#" Text="New Item" Value="New Item"></asp:MenuItem>
</asp:MenuItem>
<asp:MenuItem NavigateUrl="#" Text="New Item New Item" Value="New Item">
<asp:MenuItem NavigateUrl="#" Text="New Item" Value="New Item"></asp:MenuItem>
<asp:MenuItem NavigateUrl="#" Text="New Item" Value="New Item">
<asp:MenuItem NavigateUrl="#" Text="New Item" Value="New Item"></asp:MenuItem>
</asp:MenuItem>
</asp:MenuItem>
<asp:MenuItem NavigateUrl="#" Text="New Item" Value="New Item">
<asp:MenuItem NavigateUrl="#" Text="New Item" Value="New Item"></asp:MenuItem>
</asp:MenuItem>
<asp:MenuItem NavigateUrl="#" Text="New Item" Value="New Item">
<asp:MenuItem NavigateUrl="#" Text="New Item" Value="New Item"></asp:MenuItem>
</asp:MenuItem>
</Items>

</asp:Menu>

Tuesday, June 14, 2011

Hosting a WCF Service in a Managed Application

WCF enables you to host your service through any managed application. This means you can use a Console application, a Windows service, a Windows Forms application, or even an application built with Windows Presentation Foundation.

Hosting a WCF Service by Using a Console Application

The Console application must specifically create and open an instance of the ServiceHost object. The ServiceHost then remains open and available until it is no longer needed.

Eg:
• Create a New Project from the File menu and select WcfServiceLibrary.
Create and Implement service.
Build the project.
• Create ConsoleApplication named ConsoleServiceHost. From the project menu select Add Reference option and select the WcfServiceLibrary1.dll. Click ok.
Write the following code in the Main function.


ServiceHost host = new ServiceHost(typeof(WcfServiceLibrary1.Service1));
host.Open();
Console.WriteLine("Service Started...");
Console.WriteLine("\nPress any key to stop...");
Console.ReadLine();
host.Close();

Add an Application Configuration file to the project. And write the following configuration settings in the app.config.
<configuration>
<system.serviceModel>
<services>
<service name="WcfServiceLibrary1.Service1" behaviorConfiguration="WcfServiceLibrary1.Service1Behavior">
<host>
<baseAddresses>
<add baseAddress = "http://localhost:8731/Design_Time_Addresses/WcfServiceLibrary1/Service1/" />
</baseAddresses>
</host>
<endpoint address ="" binding="wsHttpBinding" contract="WcfServiceLibrary1.IService1">
</endpoint>
<endpoint address="mex" binding="mexHttpBinding" contract="IMetadataExchange"/>
</service>
</services>
<behaviors>
<serviceBehaviors>
<behavior name="WcfServiceLibrary1.Service1Behavior">
<serviceMetadata httpGetEnabled="true"/>
</behavior>
</serviceBehaviors>
</behaviors>
</system.serviceModel>
</configuration>

• Create a new console application. Copy the address from the app.config of ConsoleServiceHost application. Add service reference. Write the following code in the main function.
Console.WriteLine("Press ENTER when the service has started");
Console.Read();

ServiceReference1.Service1Client client = new ServiceReference1.Service1Client();

Console.WriteLine(client.GetData(33));
client.Close();
Console.WriteLine("Press any key to exit");
Console.ReadLine();
Console.ReadLine();

Monday, June 13, 2011

Hosting a WCF Service on a Web Server

Hosting a Service on an IIS Web Server
Hosting a service on an IIS Web server is very similar to hosting a traditional Web service. Services exposed this way will be highly available and scalable, but they will require the installation and configuration of an IIS Web server.

To register WCF in IIS Run the following command.

C:\Windows\Microsoft.NET\Framework\v3.0\Windows Communication Foundation>ServiceModelReg.exe -i.

You can host a WCF Service in two different ways.

1. Create WCF service in HTTP mode.
When creating a WCF Service in HTTP Mode it automatically hosted in IIS webserver. To create a service in HTTP Mode, your system must have IIS get installed.


2. Manually host the service in IIS like websites.
You can also do hosting a service by creating a virtual directory in IIS and paste you service files into your virtual directory.

Publishing Metadata Through Endpoints

WCF enables you to publish service metadata, using the HTTP-GET protocol. Clients can access the metadata using an HTTP-GET request with a ?wsdl query string appended. You do this by specifying a service behavior either programmatically or through a configuration file. The behavior is then referenced when specifying the service.

You also need to create a metadata exchange endpoint. This special endpoint can append mex to the HTTP address the service uses. The endpoint should use the IMetadataExchange interface as the contract and mexHttpBinding as the binding.

<system.serviceModel>
<services>
<service name="Service" behaviorConfiguration="ServiceBehavior">
<endpoint address="http://localhost:50187/WCFService1/" binding="wsHttpBinding" contract="IService"></endpoint>
<endpoint address="mex" binding="mexHttpBinding" contract="IMetadataExchange"></endpoint>
</service>
</services>
<behaviors>
<serviceBehaviors>
<behavior name="ServiceBehavior">
<serviceMetadata httpGetEnabled="true"/>
</behavior>
</serviceBehaviors>
</behaviors>
</system.serviceModel>

Tuesday, June 7, 2011

Advanced TextBox for Asp.Net ( TextBox with built in Validation )

Advanced TextBox Control for Asp.Net (Asp.Net Custom Server Control)
Hello friends, we all have been using Asp.Net validation controls with TextBox controls. By default, we have to configure several properties to do a validation using any validation controls. Here I'm introducing a new Custom Server Control which is derived from TextBox control. This control have some additional properties under the Advanced tab on the properties window.
The given below example shows how to create (or setup) an AdvancedTextBox control with builtin logic for validations. AdvancedTextBox control uses the TextBox and validation controls built with Asp.Net .
To develop this control, create a Asp.Net Server Control Project and write the following code.


using System;
using System.Collections.Generic;
using System.ComponentModel;
using System.Linq;
using System.Text;
using System.Web;
using System.Web.UI;
using System.Web.UI.WebControls;

namespace AdvancedTextBox
{
public enum TextType
{
String,
Int,
Double,
Date,
Email,
Url
}

[DefaultProperty("Text")]
[ToolboxData("<{0}:AdvancedTextBox runat=server></{0}:AdvancedTextBox>")]
public class AdvancedTextBox : TextBox
{
private TextType _textType = TextType.String;
private bool _isRequired = false;
List<Control> _controls = new List<Control>();

[Category("Advanced")]
[Description("Text type for the TextBox")]
public TextType TextType
{
set
{
_textType = value;
}
get
{
return _textType;
}
}

[Category("Advanced")]
[Description("Mandatory field or not")]
public bool IsRequired
{
set { _isRequired = value; }
get { return _isRequired; }
}

[Category("Advanced")]
[Description("Minimum range value")]
public string MinimumValue
{
set;
get;
}

[Category("Advanced")]
[Description("Maximum range value")]
public string MaximumValue
{
set;
get;
}
[Category("Advanced")]
[Description("Error Message to be displayed when not entering value.")]
public string RequiredErrorMessage
{
set;
get;
}
[Category("Advanced")]
[Description("Error message to be displayed when type mismatch or range violation.")]
public string TypeOrRangeErrorMessage
{
set;
get;
}

[Category("Advanced")]
[Description("Sets the Text property of associated validation controls")]
public string ValidatorText
{
set;
get;
}

protected override void OnInit(EventArgs e)
{
GenerateControls();
base.OnInit(e);
}

protected void GenerateControls()
{
if (_isRequired)
{
RequiredFieldValidator req = new RequiredFieldValidator();
req.ControlToValidate = this.ID;
req.ForeColor = System.Drawing.Color.Red;
req.ValidationGroup = this.ValidationGroup;
req.ErrorMessage = this.RequiredErrorMessage;
req.Text = this.ValidatorText;
_controls.Add(req);
this.Controls.Add(req);
}
if (this.MinimumValue != null this.MaximumValue != null)
{
RangeValidator rag = new RangeValidator();
rag.ControlToValidate = this.ID;
rag.ForeColor = System.Drawing.Color.Red;
rag.ValidationGroup = this.ValidationGroup;
rag.ErrorMessage = this.TypeOrRangeErrorMessage;
rag.Text = this.ValidatorText;
switch (_textType)
{
case TextType.Int:
rag.Type = ValidationDataType.Integer;
break;
case TextType.Double:
rag.Type = ValidationDataType.Double;
break;
case TextType.Date:
rag.Type = ValidationDataType.Date;
break;
default: rag.Type = ValidationDataType.String;
break;
}

rag.MinimumValue = this.MinimumValue;
rag.MaximumValue = this.MaximumValue;
_controls.Add(rag);
this.Controls.Add(rag);
}
else
{
switch (_textType)
{
case TextType.String:

break;
case TextType.Int:
CompareValidator cv = new CompareValidator();
cv.ControlToValidate = this.ID;
cv.ValidationGroup = this.ValidationGroup;
cv.ForeColor = System.Drawing.Color.Red;
cv.ErrorMessage = this.TypeOrRangeErrorMessage;
cv.Type = ValidationDataType.Integer;
cv.Text = this.ValidatorText;
cv.Operator = ValidationCompareOperator.DataTypeCheck;
_controls.Add(cv);
this.Controls.Add(cv);
break;
case TextType.Double:
cv = new CompareValidator();
cv.ControlToValidate = this.ID;
cv.ValidationGroup = this.ValidationGroup;
cv.ForeColor = System.Drawing.Color.Red;
cv.ErrorMessage = this.TypeOrRangeErrorMessage;
cv.Type = ValidationDataType.Double;
cv.Text = this.ValidatorText;
cv.Operator = ValidationCompareOperator.DataTypeCheck;
_controls.Add(cv);
this.Controls.Add(cv);
break;
case TextType.Date:
cv = new CompareValidator();
cv.ControlToValidate = this.ID;
cv.ValidationGroup = this.ValidationGroup;
cv.ForeColor = System.Drawing.Color.Red;
cv.ErrorMessage = this.TypeOrRangeErrorMessage;
cv.Type = ValidationDataType.Date;
cv.Text = this.ValidatorText;
cv.Operator = ValidationCompareOperator.DataTypeCheck;
_controls.Add(cv);
this.Controls.Add(cv);
break;
case TextType.Email:
RegularExpressionValidator reg = new RegularExpressionValidator();
reg.ControlToValidate = this.ID;
reg.ForeColor = System.Drawing.Color.Red;
reg.ValidationGroup = this.ValidationGroup;
reg.ErrorMessage = this.TypeOrRangeErrorMessage;
reg.Text = this.ValidatorText;
reg.ValidationExpression = @"\w+([-+.']\w+)*@\w+([-.]\w+)*\.\w+([-.]\w+)*";
_controls.Add(reg);
this.Controls.Add(reg);
break;
case TextType.Url:
reg = new RegularExpressionValidator();
reg.ControlToValidate = this.ID;
reg.ForeColor = System.Drawing.Color.Red;
reg.ValidationGroup = this.ValidationGroup;
reg.ErrorMessage = this.TypeOrRangeErrorMessage;
reg.Text = this.ValidatorText;
reg.ValidationExpression = @"http(s)?://([\w-]+\.)+[\w-]+(/[\w- ./?%&amp;=]*)?";
_controls.Add(reg);
this.Controls.Add(reg);
break;
default:
break;
};
}

}
protected override void Render(HtmlTextWriter writer)
{
base.Render(writer);
for (int i = 0; i < _controls.Count; i++)
{
_controls[i].RenderControl(writer);
}
}
}
}


When using this AdvancedTextBox control you can see the "Advanced" tab on the properties window.


  • IsRequired : when you set this property to true, then AdvancedTextBox come up with RequiredFieldValidator control.

  • MaximumValue and MinimumValue: when you set this property AdvancedTextBox come up with a RangeValidatior Control.

  • RequiredErrorMessage: Error message to be set on the Required field validation control.

  • TextType: When you set this property, Advanced TextBox come up with a CompareValidator control to ensure the data type.

  • TypeOrRangeErrorMessage: Error message to be set on either compare validator control or range validator control.

  • ValidatorText: This will be for setting the Text property of the validation controls that are come up with AdvancedTextBox control.

This control will help developers to develop GUI fastly and efficiently without specifying or declaring any validation controls to validate a TextBox.
Hope all of you are doing great programming with AdvancedTextBox Control. Feel free to ask questions and doubts. :-)

Friday, June 3, 2011

Singleton Design Pattern in .Net (C#)

Singleton Design Pattern
This pattern ensures that only a single instance of a given object can exist. It prevent developers from creating multiple instances of class. It is very simple patter to implement it in our applications. Go through the following example, it will give you the exact idea behind the Singleton Design Pattern.

    //sealed class cannot be inherited.
//thus we can prevent creating objects
//through its subclasses.
public sealed class MyDataContext
{
private static readonly MyDataContext _context = new MyDataContext();

//by defining a private constructor
//we cannot create an object from outside the class.
private MyDataContext()
{
}

public static MyDataContext Create()
{
return _context;
}


//Other operations.
}


Here in this example we can create an instance of MyDataContext class only by calling the Create method. We have ensure singleton by


  • declaring class as sealed

  • defining a private constructor to prevent outside object initialization

Hope all of you are now clear with Singleton Design Pattern. In my opinion this pattern is most used in Desktop Applications. It is possible to implement this in Asp.Net, I will post an article on that soon.

Factory Method Design Pattern in .Net (C#)

Factory Method Pattern
Like Abstract Factory Pattern, Factory Method Pattern is also a part of Creational patterns. This pattern is also to create concrete product objects. There are many ways are available to implement Factory Method Pattern in .Net. Here I will demostrate a typical structure of Factory Method Pattern.
Factory Method Pattern Structure


  1. Creator: An interface to create product objects. which contains either factor method declarations or factory methods itself. (In .Net an Abstract class or Interface is used to create Creator).

  2. Concrete Creator: It implements the factory methods declared within the Creator. (It will be class declaration)

  3. Product: Declares an interface to define products. (It will be either an Abstract class or an Interface)

  4. Concrete Product: It implements the Product to define a concrete object. (it will be class).

Have a look on the following example. Here in this example I have created all the above mentioned items.


1. Creating Product. In the example I have used an Interface named "IFruit" to create a Product.


Note: Here in our example I have used Interface instead of base classe, you can use abstract classes because abstract classes offer versioning benefits over pure interfaces.


    public interface IFruit
{
string GetDescription();
}

2. Creating concrete products. In our example I have created two concrete products named "Apple" and "Orange".

    public class Apple : IFruit
{
public string GetDescription()
{
return "I'm an Apple....!";
}
}

public class Orange : IFruit
{
public string GetDescription()
{
return "I'm an Orange....!";
}
}


3. Creating Creator: In our example I have created a creator named "IFruitFactory".

    public interface IFruitFactory
{
IFruit CreateApple();
IFruit CreateOrange();
}
4. Creating Concrete Creator: We have a concrete creator named "FruitFactory" is in our example.
    public class FruitFactory : IFruitFactory
{
public IFruit CreateApple()
{
return new Apple();
}

public IFruit CreateOrange()
{
return new Orange();
}
}
Next we can consume our sample application
            IFruitFactory fruitFactory = new FruitFactory();
IFruit fruit;

fruit = fruitFactory.CreateApple();
Console.WriteLine(fruit.GetDescription());

fruit = fruitFactory.CreateOrange();
Console.WriteLine(fruit.GetDescription());


Hope all of you are clear with Factory Method pattern. Above I mentioned only the typical way of defining Factory Method Pattern; there are several other ways to implement the same. Try it yourself. :-)

Monday, May 30, 2011

Abstract Factory Pattern in .Net with Example (C#)

Abstract Factory Pattern
Abstract Factory pattern is used to create concrete class instances without specifying the exact class type (ie, to create instance of a classe without specifying the exact class type). Abstract Factory Pattern is one of the Creational Design Patterns. Creational Design patterns are design patterns that handle object creation mechanisms.

The Abstract Factory Pattern Structure


  1. Abstract Factory: Declares an interface that creates abstract objects.


  2. Concrete Factory: Which implements the operations declared in the Abstract Factory. In Abstract Factory pattern, it may have multiple Concrete Factory classes.


  3. Abstract Product: Declares an interface that creates abstract result objects.


  4. Concrete Product: This will be the object created by the corresponding concrete factory. It implements the opreations declared in the Abstract Product.


  5. Client: Client will use only interfaces as part of Abstract Factory and Abstract Product.
For more clarification and step by step implementation of Abstract Factory Pattern, please go through the following example. The following application act as an interface for both Sql Server and Oracle databases. See how it is implemented.

Note: The following example does not cover the whole database functionality. It is just created to explain Abstract Factory pattern. Even though you can modify the code to accomplish the whole database functionality.
A Real world Example for Abstract Factory Pattern


Class Diagram


1. First we will create an Abstract Product. The below code shows an interface ("IDatabaseHelper") which will act as an Abstract Product in our sample application.

    public interface IDatabaseFactory
{
IDatabaseHelper CreateHelper();
}


Note: You can use either Inerface or an Abstract Class to create an Abstract Product.


2. Next we will create two Concrete Product which implements the Abstract Product. The classes "OracleDatabaseHelper" and "SqlDatabaseHelper" will be our Concrete Products in our sample application.

  public class SqlDatabaseHelper : IDatabaseHelper
{
private System.Data.SqlClient.SqlConnection _connection;

public System.Data.IDataReader ExecuteReader()
{
//todo
return null;
}

public System.Data.DataSet ExecuteDataSet()
{
//todo
return null;
}

public int ExecuteNonQuery()
{
//todo
return 0;
}

public object ExecuteScalar()
{
//todo
return null;
}

public void OpenConnection()
{
_connection = new System.Data.SqlClient.SqlConnection();

//todo
}

public void CloseConnection()
{
_connection.Close();
//todo
}

}


public class OracleDatabaseHelper : IDatabaseHelper
{

System.Data.OleDb.OleDbConnection _connection;

public System.Data.IDataReader ExecuteReader()
{
//todo
return null;
}

public System.Data.DataSet ExecuteDataSet()
{
//todo
return null;
}

public int ExecuteNonQuery()
{
//todo
return 0;
}

public object ExecuteScalar()
{
//todo
return null;
}

public void OpenConnection()
{
_connection = new System.Data.OleDb.OleDbConnection();

//todo
}

public void CloseConnection()
{
_connection.Close();
//todo
}
}
3. Next we will create an Abstract Factory. Here "IDatabaseFactory" interface will be our Abstract Factory.
    public interface IDatabaseFactory
{
IDatabaseHelper CreateHelper();
}
4. Next we will create a Concrete Factory which implements the Abstract Factory. Here "OracleDatabaseFactory" and "SqlDatabaseFactory" classes will act as Concrete Factory through our sample application.

Note: In Abstract Factory pattern, it is possible to have multiple Concrete Factory Classes which all implements the Abstract Factory.
 public class SqlDatabaseFactory : IDatabaseFactory
{
public IDatabaseHelper CreateHelper()
{
return new SqlDatabaseHelper();
}
}


public class OracleDatabaseFactory : IDatabaseFactory
{
public IDatabaseHelper CreateHelper()
{
return new OracleDatabaseHelper();
}
}
5. Next we can create a Client, which will use the Abstract Factory and Abstract Product. Here in our example class "DatabaseClient" acts as a client.

    public class DatabaseClient
{
private IDatabaseHelper _helper;

public DatabaseClient(IDatabaseFactory factory)
{
_helper = factory.CreateHelper();
//do any other code if needed.
}

public IDatabaseHelper Helper
{
get
{
return _helper;
}
}
}
To use the above pattern you can follow the following sample.
            DatabaseClient dbClient = new DatabaseClient(new SqlDatabaseFactory());
dbClient.Helper.OpenConnection();
//do other operations
dbClient.Helper.ExecuteNonQuery();
//do other operations
dbClient.Helper.CloseConnection();
I will upload the sample application later. You can try this example. Feel free to ask questions and doubts.